Différences entre versions de « Grange »
| Ligne 12 : | Ligne 12 : | ||
|style="text-align: center;"|[[File:Deluxe Barn.png|96px]] | |style="text-align: center;"|[[File:Deluxe Barn.png|96px]] | ||
|- | |- | ||
| − | !colspan="4" id="infoboxsection"| | + | !colspan="4" id="infoboxsection"|Informations |
|- | |- | ||
| − | !id="infoboxsection" style="text-align:right;"| | + | !id="infoboxsection" style="text-align:right;"|Amélioration de |
|style="border-right: 1px solid #8DCAF0;"|N/A | |style="border-right: 1px solid #8DCAF0;"|N/A | ||
| − | |style="border-right: 1px solid #8DCAF0;"| | + | |style="border-right: 1px solid #8DCAF0;"|Grange |
| − | | | + | |Grande grange |
|- | |- | ||
| − | !id="infoboxsection" style="text-align:right;"| | + | !id="infoboxsection" style="text-align:right;"|Coût de construction |
|style="border-right: 1px solid #8DCAF0;"|{{price|6000}} | |style="border-right: 1px solid #8DCAF0;"|{{price|6000}} | ||
|style="border-right: 1px solid #8DCAF0;"|{{price|12000}} | |style="border-right: 1px solid #8DCAF0;"|{{price|12000}} | ||
|{{price|25000}} | |{{price|25000}} | ||
|-style="vertical-align:top;" | |-style="vertical-align:top;" | ||
| − | !id="infoboxsection" style="text-align:right;"| | + | !id="infoboxsection" style="text-align:right;"|Matériaux de construction |
|style="border-right: 1px solid #8DCAF0;"|{{name|Wood|350}}{{name|Stone|150}} | |style="border-right: 1px solid #8DCAF0;"|{{name|Wood|350}}{{name|Stone|150}} | ||
|style="border-right: 1px solid #8DCAF0;"|{{name|Wood|450}}{{name|Stone|200}} | |style="border-right: 1px solid #8DCAF0;"|{{name|Wood|450}}{{name|Stone|200}} | ||
|{{name|Wood|550}}{{name|Stone|300}} | |{{name|Wood|550}}{{name|Stone|300}} | ||
|- | |- | ||
| − | !id="infoboxsection" style="text-align:right;"| | + | !id="infoboxsection" style="text-align:right;"|Capacité |
|style="border-right: 1px solid #8DCAF0;"|4 | |style="border-right: 1px solid #8DCAF0;"|4 | ||
|style="border-right: 1px solid #8DCAF0;"|8 | |style="border-right: 1px solid #8DCAF0;"|8 | ||
|12 | |12 | ||
|-style="vertical-align:top;" | |-style="vertical-align:top;" | ||
| − | !id="infoboxsection" style="text-align:right;"| | + | !id="infoboxsection" style="text-align:right;"|Animaux |
| − | |style="border-right: 1px solid #8DCAF0;"|[[File:White Cow.png|25px|link=Cow]] [[ | + | |style="border-right: 1px solid #8DCAF0;"|[[File:White Cow.png|25px|link=Cow]] [[Vache]] |
| − | |style="border-right: 1px solid #8DCAF0;"|[[File:White Cow.png|25px|link=Cow]] [[ | + | |style="border-right: 1px solid #8DCAF0;"|[[File:White Cow.png|25px|link=Cow]] [[Vache]]{{name|Goat}} |
| − | |[[File:White Cow.png|25px|link=Cow]] [[ | + | |[[File:White Cow.png|25px|link=Cow]] [[Vache]]{{name|Goat}}{{name|Sheep}}{{name|Pig}} |
|- | |- | ||
| − | !id="infoboxsection" style="text-align:right;"| | + | !id="infoboxsection" style="text-align:right;"|Dimensions |
|style="border-right: 1px solid #8DCAF0;"|'''7x4'''<br />[[File:Marker4x7.png]] | |style="border-right: 1px solid #8DCAF0;"|'''7x4'''<br />[[File:Marker4x7.png]] | ||
|style="border-right: 1px solid #8DCAF0;"|'''7x4'''<br />[[File:Marker4x7.png]] | |style="border-right: 1px solid #8DCAF0;"|'''7x4'''<br />[[File:Marker4x7.png]] | ||
|'''7x4'''<br />[[File:Marker4x7.png]] | |'''7x4'''<br />[[File:Marker4x7.png]] | ||
|-style="vertical-align:top;" | |-style="vertical-align:top;" | ||
| − | !id="infoboxsection" style="text-align:right;"| | + | !id="infoboxsection" style="text-align:right;"|Caractéristiques |
|style="border-right: 1px solid #8DCAF0;"| | |style="border-right: 1px solid #8DCAF0;"| | ||
| − | * [[ | + | * [[Trémie d'alimentation]] |
* Feeding Bench | * Feeding Bench | ||
|style="border-right: 1px solid #8DCAF0;"| | |style="border-right: 1px solid #8DCAF0;"| | ||
| − | * [[ | + | * [[Trémie d'alimentation]] |
* Feeding Bench | * Feeding Bench | ||
* Enables Pregnancy | * Enables Pregnancy | ||
| | | | ||
| − | * [[ | + | * [[Trémie d'alimentation]] |
* Feeding Bench | * Feeding Bench | ||
* Enables Pregnancy | * Enables Pregnancy | ||
| Ligne 73 : | Ligne 73 : | ||
==Intérieur== | ==Intérieur== | ||
<gallery> | <gallery> | ||
| − | File:Barn_Interior.png| | + | File:Barn_Interior.png|Intérieur de la Grange |
| − | File:Big_Barn_Interior.png| | + | File:Big_Barn_Interior.png|Intérieur de la Grande grange |
| − | File:Deluxe Barn Interior.png| | + | File:Deluxe Barn Interior.png|Intérieur de la Grange de luxe |
</gallery> | </gallery> | ||
Version du 22 août 2019 à 09:53
| Grange | Grande grange | Grange de luxe | |

|

|

| |
| Informations | |||
|---|---|---|---|
| Amélioration de | N/A | Grange | Grande grange |
| Coût de construction | |||
| Matériaux de construction | |||
| Capacité | 4 | 8 | 12 |
| Animaux | |||
| Dimensions | 7x4
|
7x4
|
7x4
|
| Caractéristiques |
|
|
|

|
Traduction incomplète Cet article ou cette section n'a pas été complètement traduit en français.
Vous êtes invités à aider à sa traduction en la révisant. |
The Barn is a type of farm building purchasable and upgradeable from Robin at the Carpenter's Shop. It takes three days to build and two days to upgrade.
The barn houses cows, goats, sheep, and pigs. Once you have unlocked an animal by building the barn needed to house it, that animal can be placed in any other non-upgraded barns you have built as well.
The total cost of a Deluxe Barn, built from scratch, is ![]() 43 000po
43 000po ![]() Bois (1350)
Bois (1350) ![]() Pierre (650) (Or, if all wood and stone are bought from Robin during year 1,
Pierre (650) (Or, if all wood and stone are bought from Robin during year 1, ![]() 69 500po).
69 500po).
Barn Animals may be stuck outside at night if the barn doors are closed. The conditions for this are not clear (see Animals trapped outside). If an animal is stuck outside the barn at night, the next day his/her mood will be "grumpy." Animals stuck outside are also subject to Wild Animal Attacks.

Intérieur
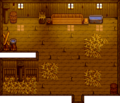
Intérieur de la Grange
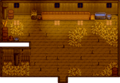
Intérieur de la Grande grange
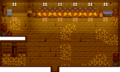
Intérieur de la Grange de luxe


